
TLDR
- Patch Manager is a great service offered by AWS that is low (or no!) cost and easy to use to keep your systems patched!
- If you already use services in the System Manager suite like Session Manager, you likely have little to no work to enable Patch Manager.
- Patch Manager is a really basic tool that can be difficult to customize if that’s your inclination.
What is Patch Manager and Why Use It?
In the Systems Manager suite of tools exists many great services. One service that can save time and increase the security of your infrastructure is Patch Manager. It exists in the Node Management section of Systems Manager and is absurdly inexpensive for the value that you get out of the service.
The service leverages the AWS SSM Agent and can be run on a multitude of platforms including Linux, macOS, and Windows. It doesn’t work with major OS version upgrades such as Ubuntu 20.04 to 22.04, but it can keep your cURL binary updated from that latest RCE that was discovered. You can also use it in conjunction with Security Hub for a detailed single pane of glass into your security posture.
There are, of course, other tools out there that can do patching. Specialized tools like Automox or configuration management tools like Ansible can do what Patch Manager does. However, off the shelf specialized tools can cost (time, money, and cognitive load) and configuration management tools may not even be adopted in some organizations so it doesn’t make sense to adopt them just for patching. If you already are running your workloads solely in AWS, why wouldn’t you use Patch Manager or at least consider it as a potential solution?
How to Start Using Patch Manager?
This comes down to a few steps:
- Install and run the SSM Agent
- Set up your inventory in Systems Manager
- Configure your patching job
Install and run SSM agent
Patch Manager requires the use of the AWS SSM Agent. This agent comes pre-installed on Amazon Linux 1 and 2 as well as several AMIs provided by AWS:
- macOS 10.14.x and newer
- SUSE 12 and 15
- Ubuntu 18 and 20
- Windows Server 2016 and newer
If your operating system isn’t on the list (Arch for example), there are several pages of documentation explaining how to install it. Most of the time it’s just via the package manager of that operating system.
For example:
sudo dnf install -y https://s3.amazonaws.com/ec2-downloads-windows/SSMAgent/latest/linux_amd64/amazon-ssm-agent.rpm
If you are using an AMI with the agent preinstalled, it should start up on system start already. If you install it manually, then you’ll need to enable and start it:
For example:
systemctl enable amazon-ssm-agentsystemctl start amazon-ssm-agent
Once you have the SSM agent installed you also need to ensure you are running an instance profile that has either the AmazonSSMManagedInstanceCore policy attached or the equivalent built into an existing role. Without the instance profile, you will not be able to communicate between the SSM agent and the Systems Manager service.
Setup your inventory in Systems Manager
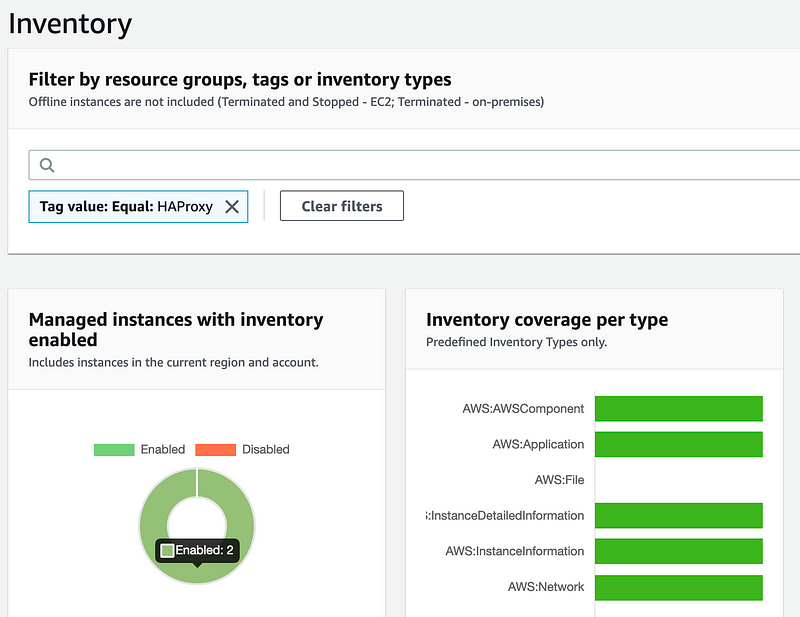
A feature of systems manager is to be able to inventory and catalog your instances (even on-prem if desired). Many times instances running the SSM agent will auto-register with your inventory, but in the case that they don’t you can manually run the inventory job.
You can verify your inventory is updated by checking the Inventory Page and confirming that your hosts are represented in the data presented.
Running a patch job
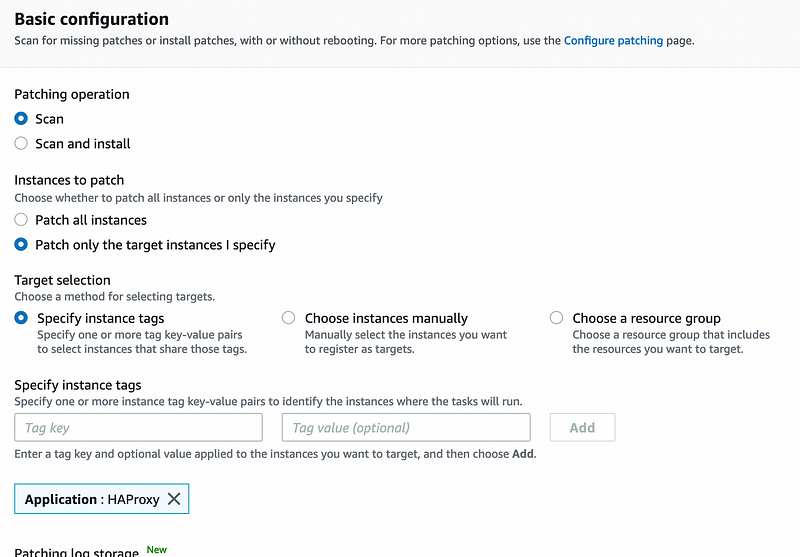
Once your inventory is set up you can run your first patch job immediately using the “Patch Now” button. The basic settings are very straightforward. You can elect to only scan the instances selected or you can scan and install patches. Additionally, there are several options for filtering targets. If you want to store the logs in S3, you are given an option to do so from this page.
Once your job is submitted you are forwarded to an execution summary page, there isn’t much information regarding the results on this page besides generic status. More useful data comes from the summary from the execution job summary where you can view the status of the patching job on each instance and dig into the output for whichever one you’d like.
More useful, however, is the Patch Manager Dashboard. After running the first patching job you can see a summary of compliance, and patch job history to name a few. So when you have a node that is non-compliant you can filter down and see what action may make sense to take next.
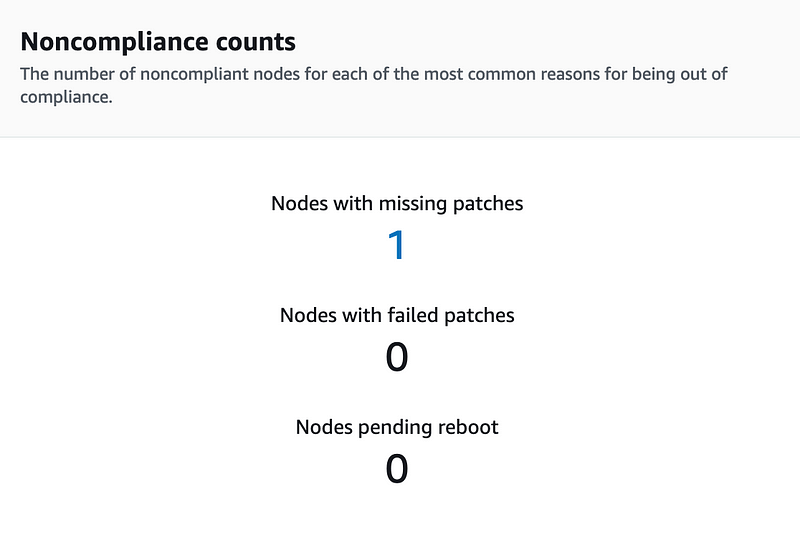
Clicking the “1” for “Nodes with missing patches”, you are brought to a list of the status and what exactly is not compliant. This makes for a great artifact for various audits and can be turned directly into actionable work by clicking the number of non-compliant items for an instance.

Clicking into the “Security non-compliant count” for the instance, you are brought to the Patch Manager reporting page with a list of what is making the instance not compliant. In this case, it’s a kernel update.
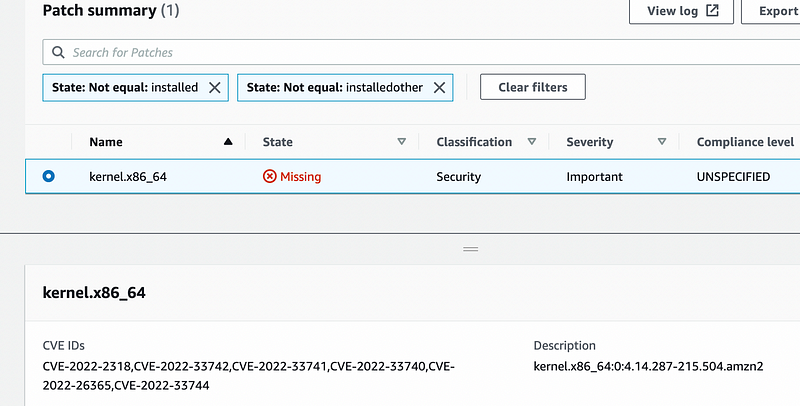
This screen is pretty useful since it also shows you any CVE IDs that are covered by the patch in question.
From here you can schedule another job to have the patching done via Patch Manager or you can patch manually (but why would you!)
Patching Baselines
For AWS, a patching baseline is essentially a configuration of what kinds of patches an instance or group is allowed to install, what severity, what is the auto-installation delay and more. It also lets you specify the compliance level of the baseline so in your reporting you can have the severity set as you define if a patch is not installed for a particular baseline.
Out of the box, you are given basic patching baselines. These baselines aren’t anything special, however, they are a great starting point while you are evaluating the service and configuring any custom patch groups or baselines you need.
Most of the default baselines are similar in configuration. The Amazon Linux 2 one, for example, has the following settings:
- If a patch is classified as “Security” with a severity of “Critical” or “Important”, it is approved after 7 days
- If a patch is classified as a “Bugfix”, it is approved after 7 days
- There is no compliance level associated with this baseline
What Are The Downsides?
As demonstrated above, Patch Manager is a great basic patching tool. It leverages a lot of the other parts of the Systems Manager service and connects directly with AWS Security Hub to provide a single pane of glass for your security posture. It also is a cheap and easy option if you are fully invested in AWS as an option and you can’t (or don’t want to) waste time with patching efforts.
However, that said, the service is extremely simple. A few other flaws I have discovered (in my opinion at least).
It’s also a very cumbersome service to customize. There is the potential for custom patch baselines (which I’ll cover another time), but they are not easy or straightfoward to set up and the documentation on the whole process is below average as far as AWS goes.
While Patch Manager covers a lot of operating systems out of the box (Most mainstream Linux distros, macOS 10.14+, and some newer versions of Windows Server), you can’t customize this at all, so if you were to want to run this an unsupported OS that isn’t in their prerequisite list then you’re out of luck.
What’s Next?
If you set the patching cadence and job broad enough, you could get away with a cheap and easy patching process that doesn’t require a lot of time. For environments like development or testing, this is great. However, I would probably still purposefully start the patching cycle in any production environment if I were to use this service.